28 Fundamental Yoga Poses and Benefits
28 Fundamental Yoga Poses and Benefits
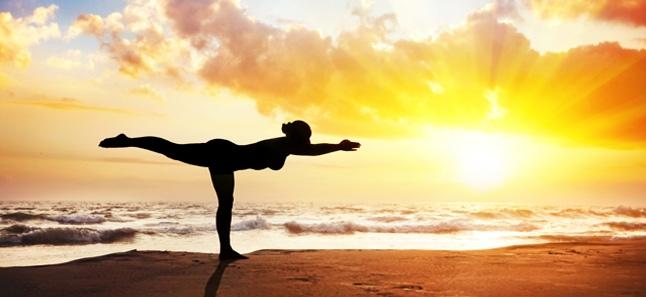
At first glance, it may look like a yoga practice is a simple relaxing exercise. But deep down, it is actually very serious in giving you the health benefits you deserve. Yoga is an ancient practice that has become a huge hit from your next-door buddies to the hottest celebs in the recent years. All these for great reasons because it brings you better sleep, less stress, a slimmer body, and a sound mind.
So before you get excited about striking a pose or asana, in yoga lingo, it is but right to familiarize yourself with the different poses. In this way, when your yoga teacher calls out “trikonasana” or “utkatasana” in Sanskrit language, you already have a clear picture in your mind as to which one it is. Whether an experienced practitioner or a newbie, this guide will help you through the basic poses in any open-level yoga class.
Basic Yoga Poses
1. Chair or Utkatasana
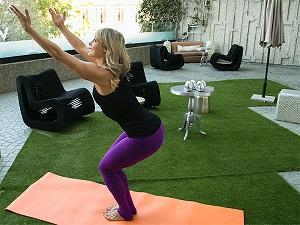 When you do the Utkatasana, you are certain to feel the burn as it is considered a heating standing pose. It is meant to strengthen you starting from your shoulders, to your upper back, and your legs.
Begin by standing with your feet together, grounded on the floor. Raise your arms and reach as far as you can with your fingers. And then sit down as if there is an invisible chair you are sitting on. Lengthen your torso and shift the weight towards your heels.
2. Puppy Dog on Chair or Modified Downward-Facing-Dog
Puppy Dog is a modified version of the Downward-facing-dog that makes way for beginners. It has the same benefits as the original pose as it opens the shoulders, stretches the hamstrings, and lengthens the spine – without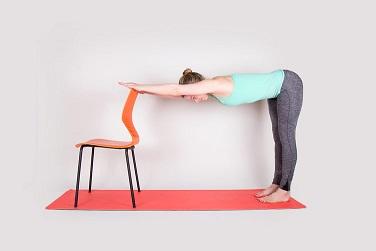 too much weight on the upper body.
To strike the pose, face the back of any chair and place your hands on the back rest. Your palms should be at a shoulder distance apart. Step back until your feet is aligned with your hips like a right angle with your spine parallel to the floor. Keep your feet grounded and lift your body using your thighs. Lengthen your torso as you stretch your hands away from your hips. With your outer arms firmly on the chair, look down and lengthen your neck.
3. Mountain or Tadasana
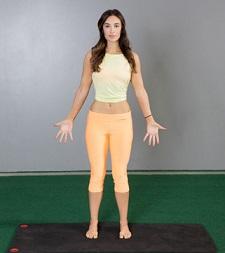 With yoga, any pose is not as simple as it looks especially when it comes to the benefits. Tadasana in particular will make you look like you are just standing, but you are actually not. This mountain pose is like the basic pattern for all the other poses. It boosts your balance and makes you focus on the present.
With your feet together, stand up and ground your feet evenly on the floor. Lift your head and thighs then lengthen all 4 sides of your waist to elongate your spine. Just breath easy and focus your attention in the moment.
4. Downward Facing Dog or Adho Mukha Svanasana
Downward Facing Dog is very calming for the whole body as with this pose, your head gets situated below your heart. Not only that, your hamstrings also get stretched out while your shoulders are opened and your spine is lengthened. The benefits of Downward-facing dog is said to be for the whole body, from your head to your toes. Because it is a strengthening and stretching asana, you will feel its effects on your hands, shoulders, arms, calves,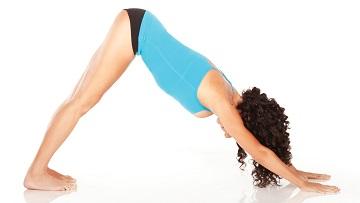 back, hamstrings, and feet. It especially strengthens those small stabilizing muscles in your feet that allows you to instantly react to a change of terrain, effectively shift your weight, and protects you from injury. At the same time, it promotes that essential balance between your mind and body.
Just like a dog on all fours, walk your hands at least a palm away in front of you. Lift your hips and back up to elongate your spine while tucking your toes. If this is too much to start, you can bend your knees slightly to bring some of the weight to your legs. Press your hands on the mat and firm up your outer arms. Try to reach your upper thighs towards the back, lengthening them as far as you can.
5. Bound Angle or Baddha Konasana
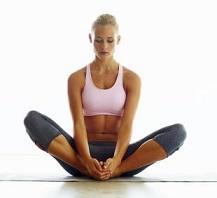 The Bound Angle pose is the best way to give those inner thighs as well as groins that much needed stretch. The forward bend likewise gives you a cooling and calming effect.
As you sit on your mat, bend your knees and then open them wide. Allow the soles of your feet to join together and make sure that you sit upright. If you can’t open your knees widely just yet, you can prop some blankets and sit on them to help your inner thighs achieve that flexibility first. Then, put your fingertips behind you on the floor while lengthening your spine. One variation is to hold onto your ankles instead of putting your fingertips behind you. With this, you can hinge your hips forward.
6. Triangle or Trikonasana
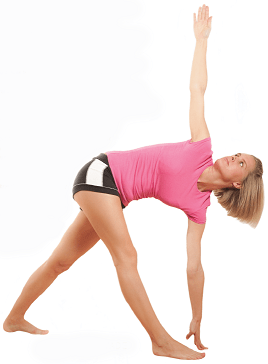 At first, the triangle pose can be challenging especially for those who are not that flexible. But if you keep doing it, you will notice that it becomes easier over time and your inner thighs and hamstrings get that proper stretch. It will create that feeling of expansion, a wider reach, and promote balance in the body.
To do this pose, you have to stand with your feed wide apart. One toe should be slightly in, say your left toes, while your right toes point to the other side directly – rotating your right thigh open. Both legs should be kept straight and your feet should be grounded on your mat. Then, pull up your thighs, roll the front thighs open and you can hinge by your front hip. Spread your arms widely at shoulder height. As you do so, ensure that your spine is lengthened towards your front foot and then you can release the bottom palm to your front ankle.
7. Warrior II or Virabhadrasana II
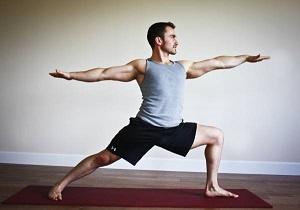 A warrior pose in yoga does not imply war in as much as it works to enhance your stamina. This standing pose is still very much Zen with the calmness and serenity of mind that it brings. When you strike the pose you will know why it is called the warrior and you will notice how it strengthens your ankles and legs.
In standing position, open your feet wide apart by at least 3.5-4 feet. Slightly turn your left foot in while turning out your right to the side by 90 degrees. Line up your front heels with your back foot’s arch. Then, bend your front knee in a 90 degree angle. To protect your knee joints, track your knee with your second toe. Give your back leg a good stretch and ground down with your back foot. Reach out with your arms at shoulder height then put your shoulder blades down. With palms wide, gaze over your front fingers.
8. Tree or Vrksasana
Yes, you are right. You are trying to mimic a tree with this particular pose and it can get really interesting. The tree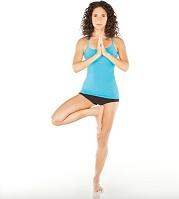 pose is going to help with your balance as well as train you to concentrate properly. Physically, it will strengthen the arches of your feel and your outer hips.
Starting with the mountain pose, bend one of your knees by using your hands to bring your foot into your inner upper thigh. One alternative, if this is difficult, is to bring your foot below your knee instead of your inner thighs. Should balancing be a problem, you can stand against the wall for support. While pressing in to your standing foot, lengthen your body up all the way to your head with your arms raised straight upward.
9. Bridge or Setu Bandha Sarvangasana
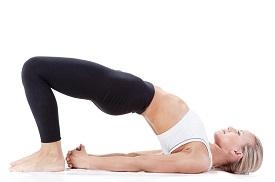 The bridge is a great pose for opening your chest and stretching your spine and neck. It aims to lower your anxiety levels, relax the mind, give you energy, and improve digestion.
Lie face up on the floor and bend your knees. Flatten your feet on your mat and keep them parallel at hip-width apart. Put your arms on your sides and push your heels under your knees. Roll your upper arms open and expand your chest. While grounding on your upper outer arms and rooting down with your heels, lift your hips off the mat. Adjust your shoulders until you are able to entwine your fingers together from underneath.
10. Corpse or Savasana
This may seem like the simplest of the poses, but it is a must in any yoga class – mostly at the end of a session. A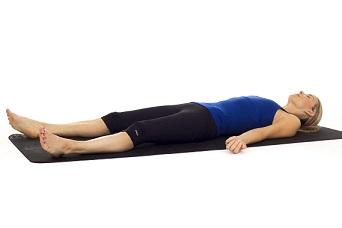 savasana is the most relaxing way to allow your body to absorb all the goodness the practice has to offer.
The corpse requires you to lie face up on your mat and separate your legs, splaying your feet freely apart. Your arms also relax along the sides with your palms facing upwards. Enjoy the bodily sensations that yoga makes you feel with your eyes closed.
Intermediate Poses
1. Intense Side Stretch or Parsvottanasana
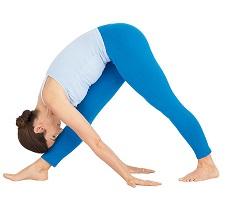 The Parsvottanasana is indeed intense in giving you calmness of mind along with a good stretch for your wrists, shoulders, spine, hamstrings, and hips.
In mountain pose, step back with your left foot, flat on your mat at a 45 degree angle. Ground both feet and then lift your thighs up while lifting your arms to shoulder height. Then, turn your arms slightly in with palms adjoined until it touches your upper back from behind. In case your shoulders are still tight, you can simply put your hands on your hips or grab both your elbows from behind. Now, you can hinge forward using your hips and then lengthen your spine over your front legs. While doing this, make sure to lift your shoulders off the floor so you can spread your chest widely.
2. Plank
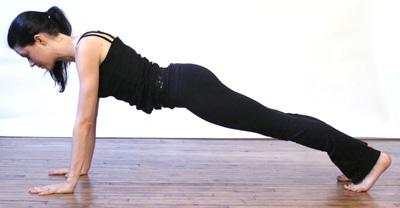 The Plank gives you that fundamental core strengthening as the pose toughens your abdominals. It is likewise considered one best move for boosting your stability.
Start this pose in a downward-facing dog then shift your weight forward so that your shoulders are in line with your wrists. Tuck your toes and press your heels back while lengthening your head forward. Ground your hands down, pull your body up using your arms, and spread your collarbones away from your sternum. Lift your front body up and allow it to support the plank pose.
3. Chaturanga Dandasana
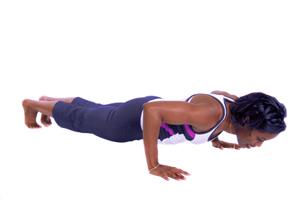 Most of the time, your vinyasa session will start with or include a sun salutation and the Chaturanga is one of its main parts. Like the plank pose, it promotes the stability and strengthening of your core and abdominals as well as your triceps.
From the Plank position, shift slightly forward and bend your elbows in a 90 degree angle – your upper arms should be parallel to the floor. Ground your palms on the floor and spread your collarbones widely. Next, lift your shoulders away from your mat while pulling your front ribs into your spine. Then, lift your upper thighs in the direction of the ceiling as you try to reach your tailbone towards your heels. Steady your gaze forward.
4. Warrior I or Virabhadrasana I
The Warrior, as an energizing pose, boosts the strength of your back muscles, arms, and legs. You are giving your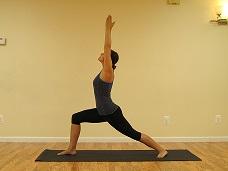 neck, chest, shoulders, ankles, and thighs that nice healthful stretch.
Starting with a downward-facing dog, step forward and turn your back foot in a 45 degree angle. Ground with your back foot and line up your heels a bit widely. Bend your front knees over your front ankles as you give your back legs a good stretch. As you inhale, lift your torso and your arms up towards the ceiling.
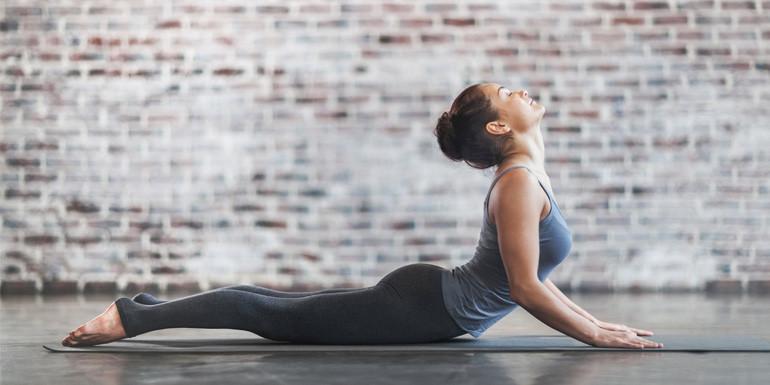
5. Upward Facing Dog or Urdhva Mukha Svanasana
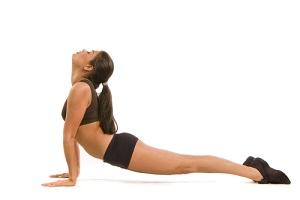 Upward-facing Dog typically appears in a sun salutation, specifically after the chaturanga. It is meant to open up your shoulders and chest as well as give your hip flexors and abs that much-needed stretch.
On your mat, lie face down and bend your elbows while placing your hands on the floor to make it in line with your lower ribs. Reach back with your legs and pull forward. Together, lift your knees and thighs away from the mat and with your chest spread out, lift your breastbone up.
6. Half Moon or Ardha Chandrasana
Yoga is mostly about enhancing your concentration and balancing abilities and these are what’s being developed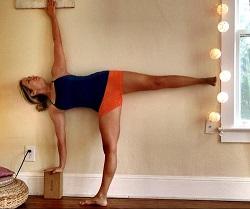 through the Half Moon. You gradually achieve balance with every pose as you strengthen your outer hips and your legs as well as stretch out your inner thighs and hamstrings.
You start a Half Moon with a Triangle pose. Bend your front knees and track them using your second toes. Step your back foot in then walk your hands for about 12-inches in front of you. Line up your thumb with one of your pinky toe. While shifting the weight towards your front foot, lift off your back foot from the floor. Reack back at your legs then raise your arm upwards. As a balancing act, you can move your chest towards the ceiling and gaze at your hand.
7. Revolved Triangle or Parivrtta Trikonasana
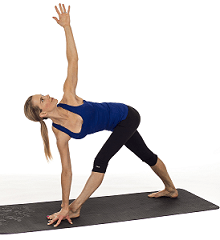 The twists and turns of your yoga practice is going to be very apparent in the Revolved Triangle. The twist is going to give your spine a healthy swig as you engage your abdominal obliques to help you execute the twist. This is also a balancing pose that stretches your outer hips and hamstrings.
Beginning in Mountain position, step back using your left foot and place it flatly on your mat at a 45-degree angle. Line up your heels together or give it a bit of space for stability. Ground both of your feet and lift your body up using your thighs. Then, hinge forward with your hips and lengthen your spine over your front thigh. Put a block on the outer or inside of your front foot and release your left hand. Rotate your body towards the right and stretch your right arm upwards.
8. Dolphin
This particular intermediate pose will prepare you for the more advanced forearm-stand and headstand. The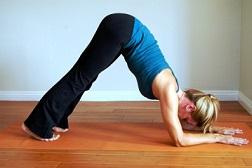 Dolphin does this by building the strength of your upper body. Likewise, it provides you with serenity of the mind and a relief from stress.
On your mat, come on your forearms and keep your elbows at a shoulder-width distance. Tuck your toes then lift your knees off the mat and hold your hips and back up. Just allow your head to hang-off the floor while you ground your forearms and lift your shoulders up.
9. Bow or Dhanurasana
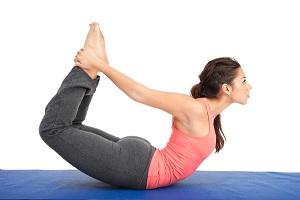 The benefits of the Bow to your overall well being is as interesting as the pose itself. This is the kind of back bend that stretches the front of your body including the chest and shoulders. As you do it, you are also giving your abdominal organs a soothing massage.
Face down, lie on your mat and lift your arms, legs, and chest off the floor. Bend your knees toward your back and reach for your outer ankles. Your toes should be lifted towards the ceiling while you spin your inner thighs upwards. Lengthen your tailbone towards the direction of the back of your knees. Spread your chest while lifting it up.
10. Camel or Ustrasana
The Camel is a great way to have a full stretch for the front section of your body, starting from your throat, thorax,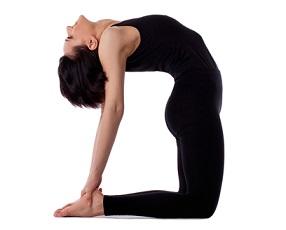 abdomen, and down to your ankles. The pose also strengthens your back muscles.
Kneel down and position your shins a hip-distance apart. Put your palms on the sacrum and point your fingers down. Press your knees down and lengthen your spine. Then, press your hips forward, squeeze in your buttocks and thighs to support your weight and bend backwards. As you do so, slowly and carefully reach for your heels and drop your head back if you feel confident and safe. Otherwise, you can simply place your hands on your sacrum. Hold on tightly and press your hips forward so that your chest can get lifted towards the ceiling.
11. Warrior III or Virabhadrasana III
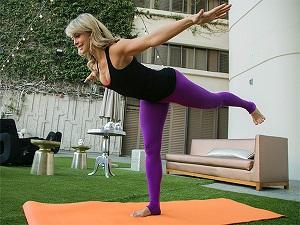 Warrior III is for better balance, memory, and posture. It is the pose to count on for strengthening your shoulders, outer hips, legs, ankles, and upper back. It invigorates and tones the entire body.
Start with your Warrior I pose and then hinge forward with your hips and give your abdomen a rest at your front thigh while you place your arms alongside your ears. Step with one foot and put your weight on this leg and interlace your fingers with the index finger pointing upwards. Lift your other leg and lower your torso and arms towards the floor. Do the same for the other side.
12. Boat or Navasana
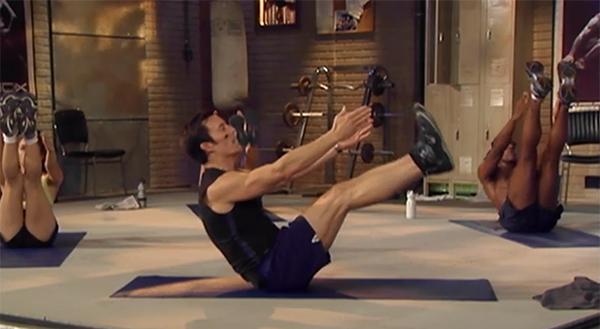
The boat pose will benefit your hip flexors and abdominal muscles as it strengthens them. It will allow the backs of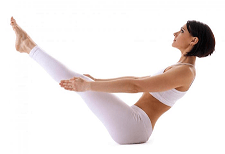 your legs a good stretch. It also works to improve your confidence and sense of balance.
To execute the pose, sit on your mat and bend your knees to bring your feet flat on the floor while pulling your legs together. Slide your hands behind the hips, point your fingers forward, and bend your elbows away from you. Lean back and lift your heels 1-2 inches off the floor. Draw your shoulder blades together and open your chest. Gradually straighten your legs to lift it up as high as you can. If you can handle it, release your arms, make it parallel with the floor with your palms down.
Advanced Yoga Poses
1. Wheel or Urdhva Dhanurasana
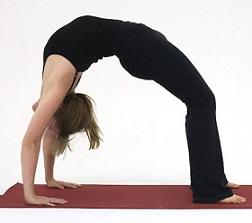 The wheel is meant to open up the whole front of your body. Muscle strengthening will be significant in your shoulders, back, and hamstrings.
To do the Wheel, you need to lie face up with your feet flat on your mat and with your knees bent. Next, position your feet parallel to each other at hip-distance apart and your heels under your knees. Then bring your hands to the mat and frame your ears while your fingers face your toes. Press down on your hands and feet as you lift your chest and hips off the floor. Straighten your arms and lift using your shoulders. Allow your inner thighs to face downward to the floor as you work on lengthening your tailbone towards your knees’ backs. To recover from the pose, bend your arms and look toward the ceiling and gradually lower your upper back down on your mat.
2. Wall-Assisted Forearm stand or Pincha Mayurasana
The Wall-Assisted Forearm stand is known as a deep shoulder-opener and prepares you for more advanced back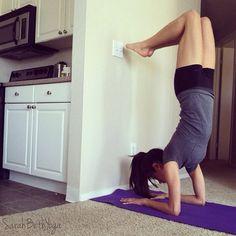 bends with every practice. Since it is an inversion, it will also help in improving your circulation.
Facing the wall, start by positioning yourself in all fours. Place your elbows on your mat and position your forearms parallel to one another at shoulder-with distance. Then, tuck your toes, lift your knees, and reach your hips and back up as in the dolphin pose. Spread your chest and focus your gaze on your mat between your forearms. Next, work your legs and step 1 foot in for a few inches closer as you lift your other leg like in Warrior III. Bring your feet up to the wall by bending your bottom knees and hopping off your feet. Give your inner thighs a good squeeze and turn up your heels toward the ceiling.
3. Headstand or Sirsasana
You have probably dreamt about finally doing this pose but you will need to consult with your doctor if it’s safe for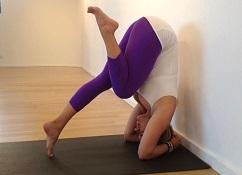 you to execute it. This is especially true if you medical issues or neck injuries. Once that is done, make sure that you have a trusted instructor to watch over and support you while attempting at it for the first time. When all is well, then you can certainly proceed with the Headstand and benefit from the strengthening of your arms, shoulders, and upper back. As an advanced inversion, it will also have a positive impact on your endocrine, lymphatic, and circulatory systems.
To start, face the wall on all fours. Interlace your fingers with your knuckles all facing the wall. Put your elbows on your mat and place them parallel to each other at shoulder-width distance. Tuck your toes under then lift your knees off the floor as you try and bring your hips up and back. Press your forearms down and lift with your shoulders. Next, move your back towards your chest and walk your feet closer to spread your collarbones widely. Position your head on the mat as you keep pressing with your forearms, concentrating all your weight there, and lifting with your shoulders. With careful control, draw your knees to your chest and put your feet against the wall while simultaneously sliding your heels up.
4. Wall-Assisted Handstand or Adho Mukha Vrksasana
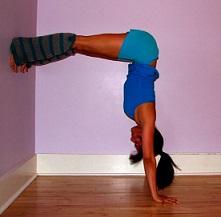 Adho Mukha Vrksasana is another inversion for advance yoga practice that is meant to give you energy, calm, confidence, stability, body control, and a sense of balance. With each practice, you will strengthen your wrists, arms, and shoulders.
Pose in Downward-facing Dog as you face the wall and put your hands at least 1 palm-print away. Step your foot in for a few inches as you lift your other leg to the air just like in Warrior III. Steady your gaze towards the wall and bend your knees while hopping off your foot to bring both your feet to the wall. Put your legs together and direct your heels toward the ceiling.
5. Shoulder stand or Salamba Sarvangasana
The Shoulder stand is very beneficial to multiple systems in your body including the circulation of your lymph and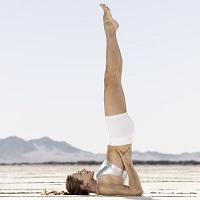 blood. Likewise, it stimulates the thyroid and promotes a strong immune system. Typically, it is done at the end of a session for its energetic and cooling effect. Before you try to do it however, make sure that you do not have any chronic or recent injury in the neck, back, or shoulders. This is also not advisable for those with menstruation, high blood pressure, or during the first trimester of your pregnancy. It is best to get a clearance from your doctor before you give it a try.
Lie on your back with your arms alongside your body and your palms down. Bend your knees, then lift your legs up and rock it down and up until the bent knees are on your forehead while you place your hands under your hips. Cup your hips and lift your legs up then straighten over your head. Support your body weight using your arms and shoulders only.
6. Crow or Bakasana
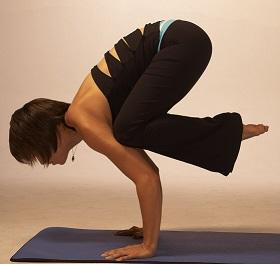 The Crow will require serious strength from you but with constant practice, it will build the power of your hip flexors, arms, wrists, and core.
On your mat, get on a deep squat with your feet together and your knees wide apart. Flatten your hands on the mat at shoulder-width distance and spread your fingers widely. While keeping your hands and feet in the same position, lift your hips up towards the sky while bending your knees and lifting your heels off the mat. Press your knees in gently towards the back of your triceps then shift your weight to your fingertips. One at a time, pick one foot off the floor. You can bend your elbows if you feel the need. Using your core strength, draw your navel in towards your spine to help you stabilize and to center the lift to your core and allow you to straighten your elbows and hold the pose.
–If you would like to try some yoga a great place to get started is with our 3 Week Yoga Retreat which can be accessed with Beachbody On Demand. You will also have access to a ton of other yoga workouts and workouts like P90X, P90X2, P90X3, Insanity, T25, Brazil Butt Lift, TurboFire and man many others.–
